pcspecialist.maxdesk.us
How To Tutorials
How to Install Memory on Your Computer
How to Install Memory on Your Computer
By Corey Sandler from Fix Your Own Computer For Seniors For Dummies
Adding memory (up to your machine’s specific limit) is generally the most cost-efficient way to increase its speed. Fortunately, installing memory is one of the most basic operations you can perform inside the case of your computer. You just have to pay close attention to details and take care not to damage your computer while you try to make it better.
Nearly all memory vendors provide instructions for installing their modules. Many also answer questions over the phone or through a chat feature on their Web sites.

 Enlarge
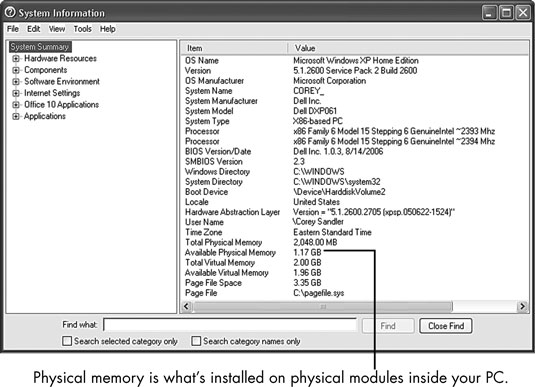
1
Find the right memory module.
Check the specifications for your computer to find the maximum amount of RAM it’s capable of managing. Most modern computers sold to consumers can handle no more than 4GB; paying for and installing more than the maximum is a waste of money and may even cause problems in some machines.
To find out what kind of memory modules you already have installed in your PC (and need to purchase), choose Start→All Programs→Accessories→System Tools→System Information. The System Information window opens, displaying a report on memory.
2
Prepare your workspace, assemble your tools, ground yourself properly, turn off the computer, and unplug the power cord and cables.
Place the computer on a sturdy, well-lighted surface, and open its case.

Enlarge
3
Look for a set of long slots that hold upright DIMM memory modules.
Most motherboards have two or four such slots, usually black, with a set of plastic lockdown/ejector clips at each end.
If you’ve already run a scanning program, you should know how many DIMM slots to look for and how many of them are already filled. In general, you should have two or four identical modules. If you’re installing larger or faster modules as a pair, they should go in the first two slots. In most designs, the slots closest to the microprocessor are considered to be slots 0 and 1 (and are marked that way on the motherboard in tiny letters).
4
If you need to remove an old module to install a new one, press evenly on both of the lockdown/ejector clips to release the unit; then lift the module straight up and out of the slot.
Place the removed module on a nonconductive surface such as a cardboard box or plastic bag.
5
Take the new module out of its antistatic bag, holding it by the edges.
Avoid touching the metallic connectors on each side of the bottom of the module to keep oils from your fingers from interfering with the module’s contact with the motherboard.
6
Follow the installation instructions provided by the memory seller.
In most situations, you’ll be asked to put the largest-capacity modules in the first slots and the smaller ones in the higher-numbered slots.

Enlarge
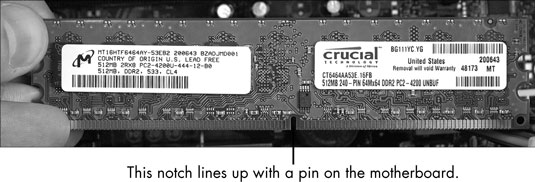
7
Locate the notch in the row of pins at the bottom of the module.
It needs to line up with a matching pin or key in the DIMM slot on your motherboard. The location of the notch depends on the type of module your computer uses. If the notch and pin don’t line up, turn the module 180 degrees and try that way.
8
With the notch and pin aligned, press evenly on both ends of the module until it’s fully inserted into the slot on the motherboard and the lockdown/ejector clips clickinto place.
Don’t attempt to force the module into the slot if it seems to be a complete mismatch. Contact the provider of the memory module to make sure that you received the proper type for your PC.
9
Examine the inside of the case to make sure that all the memory modules are locked down properly and that you didn’t leave anything inside.
10
Put the cover back on, secure it properly, return the machine to its usual location, reattach the cables and power cord, and turn on the juice.
11
Check the amount of installed memory.
See Step 1 if you’re not sure how to do so.
By Corey Sandler from Fix Your Own Computer For Seniors For Dummies
Adding memory (up to your machine’s specific limit) is generally the most cost-efficient way to increase its speed. Fortunately, installing memory is one of the most basic operations you can perform inside the case of your computer. You just have to pay close attention to details and take care not to damage your computer while you try to make it better.
Nearly all memory vendors provide instructions for installing their modules. Many also answer questions over the phone or through a chat feature on their Web sites.
1
Find the right memory module.
Check the specifications for your computer to find the maximum amount of RAM it’s capable of managing. Most modern computers sold to consumers can handle no more than 4GB; paying for and installing more than the maximum is a waste of money and may even cause problems in some machines.
To find out what kind of memory modules you already have installed in your PC (and need to purchase), choose Start→All Programs→Accessories→System Tools→System Information. The System Information window opens, displaying a report on memory.
2
Prepare your workspace, assemble your tools, ground yourself properly, turn off the computer, and unplug the power cord and cables.
Place the computer on a sturdy, well-lighted surface, and open its case.

3
Look for a set of long slots that hold upright DIMM memory modules.
Most motherboards have two or four such slots, usually black, with a set of plastic lockdown/ejector clips at each end.
If you’ve already run a scanning program, you should know how many DIMM slots to look for and how many of them are already filled. In general, you should have two or four identical modules. If you’re installing larger or faster modules as a pair, they should go in the first two slots. In most designs, the slots closest to the microprocessor are considered to be slots 0 and 1 (and are marked that way on the motherboard in tiny letters).
4
If you need to remove an old module to install a new one, press evenly on both of the lockdown/ejector clips to release the unit; then lift the module straight up and out of the slot.
Place the removed module on a nonconductive surface such as a cardboard box or plastic bag.
5
Take the new module out of its antistatic bag, holding it by the edges.
Avoid touching the metallic connectors on each side of the bottom of the module to keep oils from your fingers from interfering with the module’s contact with the motherboard.
6
Follow the installation instructions provided by the memory seller.
In most situations, you’ll be asked to put the largest-capacity modules in the first slots and the smaller ones in the higher-numbered slots.
7
Locate the notch in the row of pins at the bottom of the module.
It needs to line up with a matching pin or key in the DIMM slot on your motherboard. The location of the notch depends on the type of module your computer uses. If the notch and pin don’t line up, turn the module 180 degrees and try that way.
8
With the notch and pin aligned, press evenly on both ends of the module until it’s fully inserted into the slot on the motherboard and the lockdown/ejector clips clickinto place.
Don’t attempt to force the module into the slot if it seems to be a complete mismatch. Contact the provider of the memory module to make sure that you received the proper type for your PC.
9
Examine the inside of the case to make sure that all the memory modules are locked down properly and that you didn’t leave anything inside.
10
Put the cover back on, secure it properly, return the machine to its usual location, reattach the cables and power cord, and turn on the juice.
11
Check the amount of installed memory.
See Step 1 if you’re not sure how to do so.
Was this article helpful?
0
0
(Login to rate)